Creating flood orders and adding additional properties to those orders is easy in Built. You can also add and update flood certificates in Master Guidance Line of Credit (MGLOC) and Borrowing Base loan agreements to keep all your information and documents in a centralized location.
Table of contents
Create a flood orderAdd flood orders to an existing flood orderAdd or update a flood certificate for a subdivisionAdd or update a flood certificate for a unit of collateralTroubleshooting
Create or update a flood order
- Click the Collateral tab in your loan agreement.
- Click on the Legal Description column for the applicable collateral unit.
- To select multiple units in a row, click the first applicable unit and drag the cursor across the other desired units.
- To select multiple units that are not in a row, hold the CTRL-key on your keyboard and click on each applicable unit.
- Right-click on one of the selected units and select Create Flood Order for # Items where # is the number of units selected.
- In the Create Flood Order pop-up, select the Order Status and Flood Order Date.
- Click Submit.
Add flood orders to an existing flood order
- Click the Collateral tab in your loan agreement.
- Click on the Legal Description column for the applicable collateral unit.
- To select multiple units in a row, click the first applicable unit and drag the cursor across the other desired units.
- To select multiple units that are not in a row, hold the CTRL-key on your keyboard and click on each applicable unit.
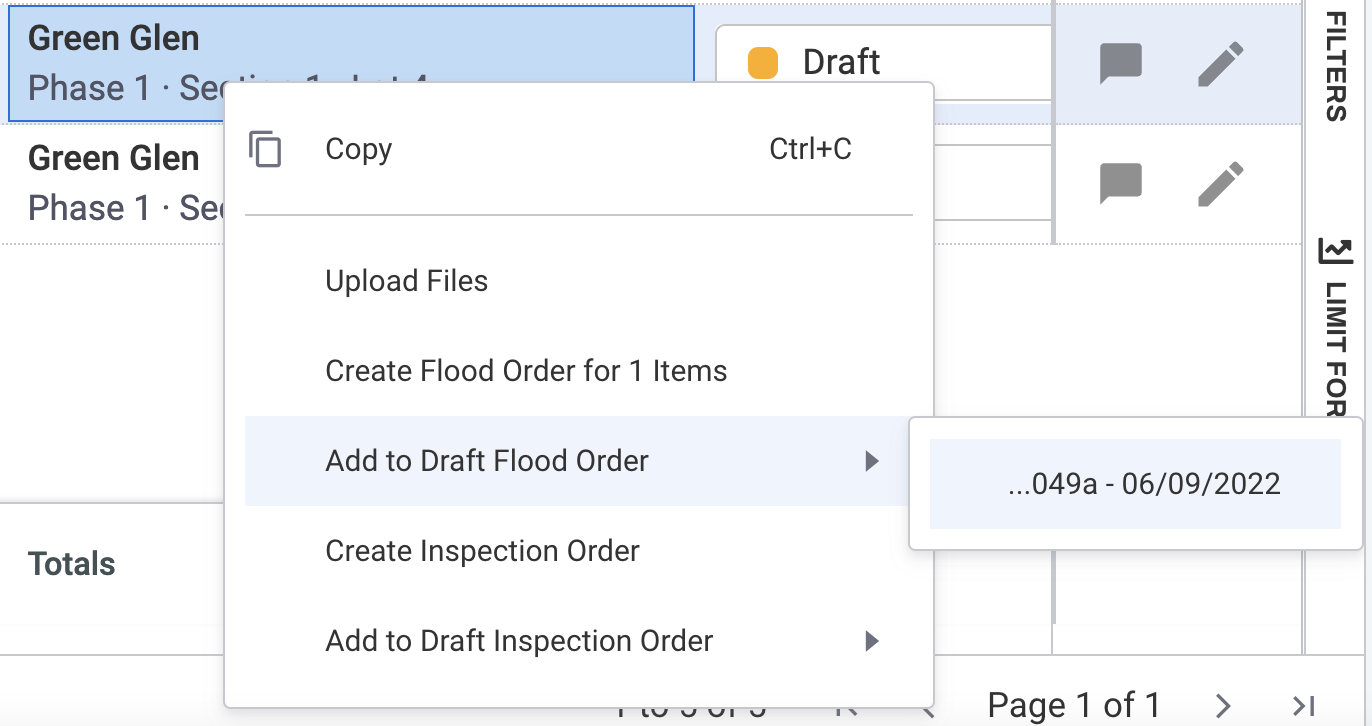
- Right-click on one of the selected units and select Add to Draft Flood Order.

- Select the existing draft order from the drop-down.
- Click Save and Close or Save and View Order.
Add or update flood certificates for a subdivision
Adding or updating flood certificates at the subdivision level allows you to apply multiple flood certificates to specific units of collateral in one process.
- Click the Subdivisions tab in your loan agreement.
- Find the subdivision you want to add a flood certificate to and click the in-line Edit icon.
- Click the Flood tab.
- Click Create Flood Certificate if this is your first certificate or Add Flood Certificates to add another certificate.
- In the Add Flood Certificate(s) pop-up, select the Determination Date and Flood Zone in their respective fields.
- Enter the Certificate Number in the respective field.
- Click Submit.
Add or update flood certificates for a unit of collateral
Adding or updating flood certificates at the collateral unit level will roll up to the subdivision, making certificates added at the unit level available for other units in the subdivision. Additionally, the latest certificate added will override the previous certificates added as the active certificate on the unit
- Click the Collateral tab in your loan agreement.
- Find the collateral unit you want to add or update a flood certificate to and click the in-line Edit icon.
- Find the Flood Tracking section on the collateral unit’s Overview page.
- Find a flood certificate in the Flood Certificates section or click the Create New link to create a new flood certificate. If creating a new flood certificate, complete the Flood Zone, Certificate Number, and Determination Date fields in the Add Flood Certificate pop-up.
- If available, fill out the Notice to Borrower Signed Date, Flood Insurance Effective Date, and Flood Insurance Expiration Date fields.
- Click Save Changes.
Troubleshooting
Unable to select subdivision for flood certificate
If you aren’t seeing a subdivision populate in Step 5 of
Add or update flood certificates for a subdivision, there may be an archived
appraisal or
plan interfering with your update.


